Get Crafty: Studded T-Shirt

studs 0901114I’m obsessed with anything that has details: studs, chains, pearls, you name it. I love anything that gives my outfit a little attitude.

I’ve been on the hunt for a studded shirt for months and couldn’t find anything I really liked. Last weekend, I was perusing through the Old Navy clearance rack and I found this t-shirt for $7. *Score* I ran over to Michael’s and found a variety of studs, from silver to gold, to the kind with the teeth that you poke through the fabric, to these “iron on” studs. (Tip: They were in the aisle with the t-shirts and puff paints.)

These particular ones came in a 5″ x 5″ sheet. Each stud is connected by a little string. Originally, I thought these were iron on (as the label instructed). Imagine my dismay when I opened the package, only to find out that you need fabric glue (what IS that?!) or you need to sew these on by hand. UGHHHHH. I had my mind set that I was going to finish this project tonight. I just HAD to.

So, I took a deep breath and decided to tackle it. The only glue I had in my apartment was Krazy Glue. Krazy Glue works on pretty much everything BUT fabric. Great. I had no choice but to turn to my trusty sidekick, my sewing box. I hand sewed each stud, and cut off the excess sheet, mimicking the pattern from one side to the other.

Quick tip: Before I started sewing, I measured my “design” to see how far down I wanted to go, and traced a faint line with my “sewing pencil” (It’s made for fabric, and smudges out when you rub the fabric together.)

This project took about two hours to do. It was a little frustrating because the studs kept moving as I sewed. I did try to pin it down, but that didn’t really work either. Next, I want to try a pair of ballet flats — and try “fabric glue”. (I still think it’s not a real thing.)

DIY: Hot Chocolate Stirrers

This Saturday, I declared it an “At Home Saturday”. The rules of “At Home Saturday” are very simple: I’m not allowed to leave the house for anything other than the gym. It sounds simple, but for me, it’s very hard to lay around and do nothing.

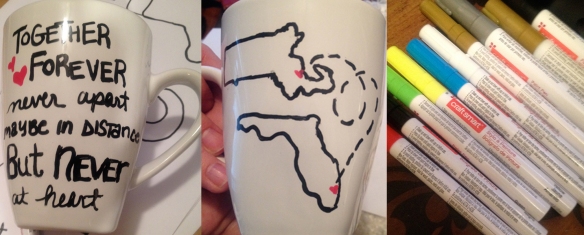
I woke up Saturday, immediately thinking, “I should do XYZ” and within five minutes had a list of half a dozen things I “should” do. I took a deep breath, and told myself “NO. You have to relax!” So instead, I spent the morning perusing one of my favorite blogs, A Beautiful Mess, where I found this gift idea. I have been working on a Christmas gift (yes, I know–I’m a slacker) for a couple friend of mine over the last few weeks. They are recent newlyweds, and such a sweet couple. I made them His & Hers mugs, and got them giftcards to Starbucks (they’re obsessed and have a competition going for who can get the most gold stars) to put inside, but have been racking my brain to think of something else to put in them. So, when I came across the wooden spoon idea, I thought it was perfect! The only problem? I didn’t have the wooden spoons and refused to break the rules to get them. I didn’t have wooden spoons but what I did have were large stirring sticks–so I used those, and some leftover chocolate (white, peanut butter, and dark chocolate chips) to make my own stirring sticks for hot chocolate. I decorated them with things I had in the house: chopped nuts from cookies I made, leftover homemade peppermint marshmallows, and other chocolate flavors. Moral of the story: Get creative and use what you have vs. running to the store!

Image

DIY: Onesies!

One of my oldest friends is pregnant, and as an honorary “aunt”, I had to make my little nephew something special. For those of you that don’t know me, you should probably know one thing about me: I am super crafty and love to make gifts for my friends and family. I had been racking my brain for weeks, but wasn’t sure what to make for him…until I came across my fellow-blogger, The Thinking Closet‘s post on making Freezer Paper Onesie’s with a Silhouette. Since I don’t have a Silhouette, I had to improvise a little. Below is a quick (and easy) tutorial:

Image

(Forgive me because the photo quality isn’t great, and I forgot to take a picture of the original onesies, but I purchased a pack of five at Target for under $10.)

Supplies:

  • Ruler
  • Fabric (I got 1/8 of a yard and chose three different kinds)
  • Pencil & Paper
  • Fabric pencil
  • Fusing
  • Iron
  • Fabric scissors
  • Pellon Fusible Webbing (I got a thin kind)

Steps:

1) Iron onesies and set aside. Then, iron your fabric.

2) Decide what shapes/designs you want. My friend has a nautical theme in her nursery so I went for things like whales and fish. Use Pinterest or Google to help spark creativity.

3) Draw your design onto the fabric (I used the fabric pencil at first but mine is white and it was too hard to see, so I went with a regular pencil). Then, iron the fabric on to the fusible webbing (read the instructions, but in my case, the wrong side of the fabric matched up against the rough side of the webbing).

4) Cut out your shape with fabric scissors.

5) Peel the backing off of the webbing and using a damp towel (put it between the iron and the fabric), iron it on to the onesie. You’ll have to hold the iron there 5-8 seconds.

Ta da…a cute little onesie! See? So easy! This was a fun, simple, and easy gift. My friend loved it and I had so much fun choosing the designs. Hope you like making them!